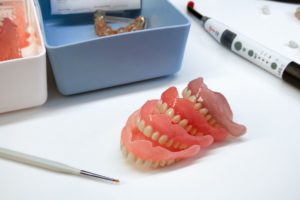
3D printing dentures in-house often leads to less wait time — plus, a more comfortable fit for the patient.
3D printing is becoming increasingly popular among dental practices looking for a better approach to producing dentures. The ability to create dentures in-house means patients receive their dentures faster, and they often get a better fit. It’s also much easier to replace the dentures and reprint them if the patient needs a replacement.
The basics of 3D printing
The 3D printing process starts with an intraoral scan. Using an intraoral scanner, the dental assistant can scan the patient and generate an STL file. From there, the dentist can design the restoration themselves or send it to a lab to create it.
To get started with implementing a 3D printing workflow, take the patient's denture and do a heavy body and wash impression. Look for any high spots, and grind these out before doing the wash. Shape the patient’s face, and perform all the border molding. Take it out of the patient’s mouth and scan it in your hand, making sure you capture some teeth for reference. Then perform a buccal bite by popping the denture back into the patient’s mouth with the impression.
If the patient has no teeth, you can scan the patient’s mouth and make an occlusal rim. This file can be used to print a model or can be sent to a lab.
The next step is post-processing. “3D printing involves printing out a flowable composite,” explains Dr. August de Oliveira, an innovator in high-tech dentistry and author of “Implants Made Easy,” “Guided Implantology Made Easy” and “Dental 3D Printing Made Easy.” “With flowable composites, there is a cured layer and an air-inhibited layer, the latter of which is toxic. If you’ve ever left uncured bonding agent in a patient, that free monomer can actually burn the gums. Similarly, you don’t want to take an object right out of the printer and put it in the patient’s mouth.”
Post-processing alleviates this problem. This means taking the dentures out of the printer and washing them in isopropyl alcohol (preferably 99%) and post-curing them in a light oven. Many printers come with their own wash station and cure station for this purpose.
The anatomy of a 3D printer
3D printers each include a UV protective cover to protect the composite from hardening under the light, a resin vat to hold the flowable composite and a build plate. The UV light comes up from underneath the bottom of the resin vat and cures the model, layer after layer. The printer is connected to a laptop or desktop computer where files are stored. Having these files makes it easy to reprint dentures if something happens to the original ones.
When considering which printer to buy, it’s helpful to know its XY resolution. The SprintRay Pro95, for example, has an XY resolution of 95 microns, which means the smallest item it can print is 95 microns. That works for printing items such as night guards, dentures and surgical guides. If the practice will be printing items such as dyes, hybrids or implant analog models, that will require a printer with under 75 microns, such as the SprintRay Pro55.
The size of the build plate is another important factor. Having a large build plate makes it possible to print more models. For practices that are printing large volumes in-house, they will want a larger build plate.
Approaches to 3D printing dentures
When it comes to printing dentures in-house, it costs roughly $35 to design a set of dentures and $15 - $20 to print. “Though milled or processed dentures are better for permanents, printing immediates in-house is a good option,” says Dr. de Oliveira.
There are three ways to print a denture:
- 3D print the denture base. A number of companies such as NextDent, Desktop Health (formerly EnvisionTEC) and Dentsply Sirona have denture-based material that is 3D printable. Different resins are used for different printers. Print the base and affix the dentures into the sockets with pink denture resin. Then, simply put a drop in the sockets, put the denture teeth in them and light cure them.
- Print the monolithic way. This involves taking composite such as BEGO, printing an entire arch and then layering composite and stain on top of it. The benefit of this method is that it provides a very strong restoration. However, it can take a bit of artistry on the dentist’s part to design the gums.
- Print in two pieces. This is the quickest and most inexpensive approach, involving printing the base, printing the teeth and linking them together. First, print the base in gingival composite, then print the teeth in tooth-colored composite. Place a bit of gingival composite into the sockets, put them together and then place the finished product in the light oven.
Conclusion
3D printers are a cost-effective way to advance the practice. This technology offers practices new opportunities to delight patients, with faster, more convenient denture production. Choosing the optimal printer resolution depends on numerous factors, including the types of materials to be printed, as well as the cost and space considerations. Getting up and running with 3D printing dentures can take some trial and error. Fortunately, the technology available today is improving, and there are many opportunities to incorporate 3D printing into dental practices in a way that benefits practitioners and patients alike.
To learn more about 3D printing, visit https://henryscheinequipmentcatalog.com/cad-cam/3d-printers.
