By Cynthia K. Brattesani, DDS
I also remember the disappointment of pulling out a mount only to find that the film of #19 fell out or was sent to insurance and never returned. Or there’s the photo I needed, but it was damaged. The only good thing you could say about this system is that, assuming they were filed away correctly, at least all the X-rays and photos were in one place.
Then I decided to “go digital.” With each step, I feel I’ve truly benefited from my digital conversion. However, there came a time when I had too many software programs housing my images. I had a software program for practice management, one for my digital radiography system, one for my intraoral photography, another for my digital still camera, and yet another program for scanning of X-rays and photos. I realized that I was spending too much time trying to find and use these images.
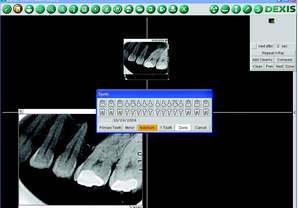
Figure 1
Here’s an example: Since my older photographic software program worked on a folder method, I initially started saving images by category, such as restoratives, cosmetics, or periodontics, and using subfolders with the patient’s last name. When I wanted to view a restorative image on a certain patient, I opened the separate software program and searched through folders. Once I found the right folder, I searched to find the right image. I then would display that image within the software. If I needed to see other types of images for this patient, I would also open those programs and go back and forth.
The issue was that I did not have an easy yet comprehensive way to catalog and display all of the various kinds of images that I captured in my practice. I wasn’t alone. Some of my colleagues shared that they were facing the same issue. They, too, had their images in different programs. Accessing them quickly for study and presentations was a daunting task. I decided to simplify my imaging “life.”
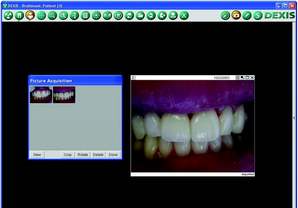
Figure 2
I started my search with my practice-management software. The system offered a digital imaging add-on, but it was expensive and cumbersome to use. I then discovered that I already owned what I needed! You see, the best digital radiography systems now consolidate all the imaging functions dentists need in order to capture, display, and communicate digital images. This program becomes your imaging hub, a place where you capture, store, retrieve, and use both radiographic and photographic images.
I remembered learning about all the capabilities of my digital radiography software at training. Since I already had a camera and scanning program in place when I added digital radiography, I have to admit that I only used my digital radiography software for the capture of intraoral X-rays. However, now, I needed a change. I began exploring the software. I was surprised to see how simply I could bring all my images together in this one place. Over the next few weeks, I began working within the system. I was very pleased with the results.
Now, there’s no more searching my computer’s hard drive to find images that are stored in different places. I simply capture intraoral camera images using the live video screen, each one gets a tooth number just like my X-rays. I scan periapicals and panoramics by clicking on the scan icon. There’s even a feature that automatically tooth numbers each scanned periapical (Fig. 1).
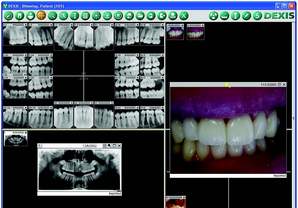
Figure 3
After I take photos with my digital camera, I pop its memory card into the computer, and click one button to display them (Fig. 2). I can select the ones I want and add them to the patient’s screen with a click. I found there were actually fewer steps involved to capture and access the images in my digital radiography software than in my camera or scanning programs. The benefit here is that now, when I open a patient’s record, every picture the patient has, whether it’s a digital X-ray, digital or scanned pan or ceph, or an intraoral or extraoral photographic image, is right there on display (Fig. 3). Housing images in this way has allowed me to become very well organized in this important aspect of my practice.
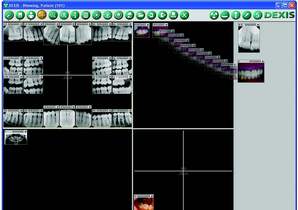
Figure 4
As part of this imaging hub, not only do I have full access to my patients’ images in one place, I am able to utilize images in an efficient manner. Whether I am using the images in treatment or communication, there are effective tools within the software that can be easily applied to all the types of images by virtue of them being in one place.
One such tool is the isolation of images that aids in patient education and case presentation. When presenting a case, for instance, whether ahead of time or while the patient is in the chair, I look at all the images on one screen and drag the ones I want to use to the presentation area (Fig. 4). We then view the selected images together as I explain the procedures to my patient. It makes for a very neat and clean presentation.
Isolating images works for the administrative process as well. For example, there’s no question what images I want to send to a colleague if I isolate them. If I need to document a case for insurance about a tooth I’ve restored, I also use this capability. For instance, in a case where a radiographic image may not be enough, I can pull together several photographic images as well, and my front desk team knows exactly which images to electronically send to the insurance company.