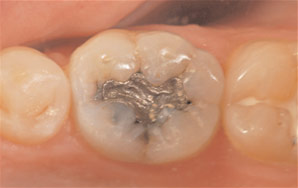
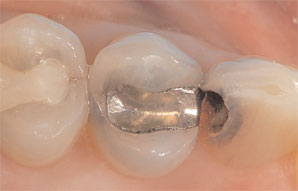
Case 1. Figure 1. Preoperative view of the patient showing recurrent decay around the existing amalgam restoration.They need and want dentistry that fits their lifestyle. As a result, dentists must be competent in providing state-of-the-art care in convenient ways to satisfy both elective and necessary treatment needs. That means they must begin to embrace same-day, in-office dentistry that enables them to take control of all-ceramic restorative processes in order to provide restorative dentistry in a whole new way
That new way is using an innovative in-office CAD/CAM technology called the E4D Dentist System that facilitates the same-day, same-visit delivery of crowns, veneers, inlays, and onlays milled from esthetic and durable all-ceramic blocks (Paradigm C/Paradigm MZ100, 3M ESPE, St. Paul, MN; Empress CAD/CAD LT, Ivoclar Vivadent, Amherst, NY). Although the concept of chairside all-ceramic restorations is not new, an intuitive technology with a completely new hardware platform that simplifies the necessary processes associated with a dental office creating an all-ceramic restoration is.
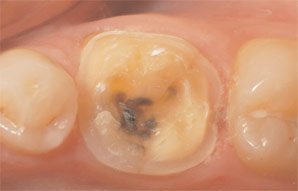
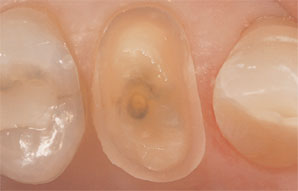
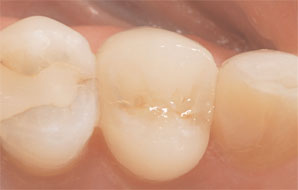
Case 1. Figure 2. View of the preparation design, which was kept above the gingival margin to enable cleanability and conservation of natural tooth structure.
This article introduces the reader to the E4D Dentist System by demonstrating its use, features, and benefits when applied to the treatment of two single-tooth restoration cases. It is for this type of single-tooth, same-day dentistry that the incorporation of chairside CAD/CAM dentistry has the potential to maximize office efficiency, profitability, convenience, and teamwork, as well as elevate patient satisfaction and comfort.
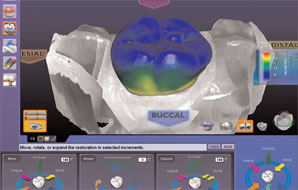
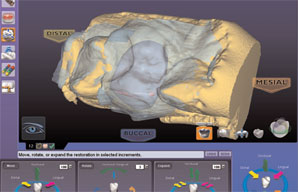
Case 1. Figure 3. This screen shot of the intuitive DentaLogic™ software shows the computer-generated model of the proposed restoration in the ICE mode (i.e., “I See Everything”), with the photographic rendering of the preparation and adjacent tooth structure. At any time during the design process, the E4D Dentist System operator can check the material thickness. Here, the blue color shows that there is at least the optimal thickness of 2 mm or more; around the margin the other colors indicate less porcelain near the finish line.
Case #1
A 43-year-old male patient presented with an existing amalgam restoration in the lower left first molar that exhibited recurrent decay and fracture lines that were weakening the cusps (Case 1, Figure 1). Following a thorough examination, it was determined that the tooth required a full-coverage crown restoration. A long-time patient of record whose medical history was noncontributory, he was a busy agent for the Federal Bureau of Investigation who was “devastated” at the prospect of undergoing dental procedures for a crown.
However, it was explained to the patient that because there was sufficient healthy tooth structure remaining—and using technologies available in the practice—a more conservative restoration could be provided in the single visit using the E4D Dentist System. He was told that there would be no impressions, no temporaries, and no return visits. The patient accepted that proposed treatment plan.
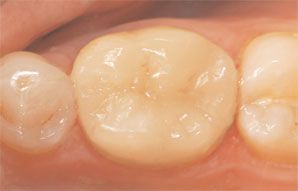
Case 1. Figure 4. Postoperative occlusal view of the same-day, in-office E4D restoration.
It was decided that the appropriate shade for the patient’s restoration was A3, and a suitable block was selected in size 14 (Empress CAD LT, Ivoclar Vivadent, Amherst, NY). The patient was anesthetized with 1.5 carpule Septocaine 4% with 1:100 epi, after which the failing amalgam and all fracture lines were removed. The preparation was designed to satisfy the conservative requirements of all-ceramic materials, including 1.5 mm to 2 mm occlusal reduction and a shoulder margin of ideally 1.2 mm in width (Case 1, Figure 2). Note that maintaining the margin above the gingival margin facilitates easy clean up and continued hygiene maintenance by the patient.
The tooth was then rinsed and dried, after which the E4D imaging process was initiated using the IntraOral Digitizer (IOD) high-speed laser scanner to capture approximately 9 digital impressions of the preparation and neighboring teeth. These were taken in under 2 minutes and used to create a 3D image of the intraoral environment and the proposed restoration.
It is important to note that unlike other systems that may be available, the E4D system does not require the use of areflective agent or powder in the mouth in order to acquire the data. Rather, the E4D Dentist System uses visible laser light technology to accurately image millions of data points from multiple views. Additionally, this scanning technology can distinguish between hard and soft tissue.
Case 2. Figure 1. Preoperative view of the quadrant showing decay in the canine and a defective amalgam restoration in the upper first premolar.
When imaging the prepared tooth was complete, a small pad of bite registration material was placed over the preparation, and the patient was asked to bite into it to capture an imprint of the opposing teeth. This bite strip was then also scanned using the IOD so that the E4D DentaLogic™ software could subsequently automatically align the bite strip and the preparation to create the proper occlusal relationship.
Once this image was captured, the restoration was then designed chairside. Using the E4D DentaLogic™ software, a proposed model for the restoration was created. At this point, the operator began by properly aligning the model (e.g., path of insertion) and then identifying the margin. The software automatically aligned the bitestrip image and preparation image using the data scanned from the adjacent teeth; there was no need to be concerned about camera alignment between models (Case 1, Figure 3). The software then proposed a customized restoration from the database selected.
Case 2. Figure 2. View showing the preparation of the premolar for an E4D restoration and completion of a composite restoration on the canine.
After the restoration was completely “built up” on screen, the operator edited and modified its size and shape, as well as any other areas in need of refinement (e.g., contact areas). It’s worth noting that the E4D Dentist System includes an Autogenesis™ feature that customizes the proposed tooth restoration for an individual patient’s mouth. Specifically, this Autogenesis tool positions and shapes the initial tooth template to match central grooves, cusp heights, and marginal ridges of the neighboring teeth. Therefore, a proposed restoration is reflective of the patient’s own natural contacts, embrasure, marginal ridges, cusp heights, and occlusion— helping to minimize the need for editing.
But when editing was required, the E4D Design Center and its DentaLogic™ software guided the operator with a graphical interface and familiar workflow. Its design tools include those that enable shape and size changes by specific numbers of microns or degrees, as well as the “Rubber Tooth” feature that allows the clinician to push or pull any area of the proposed restoration to reshape or resize it.
Case 2. Figure 3. A small amount of bite registration material was carefully applied to the prepared tooth.
The design process for this restoration took approximately 3 minutes, after which the selected block was placed in the separate and independently operating E4D Milling Center, where the designs from the DentaLogic™ software were sent for fabricating the restoration. The heavy duty design of the Milling Center reduces vibration for high-level accuracy and material performance, as well as in-office quiet. Milling requires anywhere from 8 to 18 minutes, depending upon the size of the restoration, and each restoration is milled with its own special tool path that is calculated automatically and adds integrity and strength to the final restoration. The restoration in this case required a 16-minute mill.
Case 2. Figure 4. This screen shot of the DentaLogic™ software helps to illustrate the design progress. A translucent view of the bite strip that was imaged during the scanning process has been superimposed and automatically aligned by the software. The location of the opposing teeth is clearly visible so that the occlusion can be manually designed, or the automatic design tools can be used to refine the bite relationship of the proposed restoration.
When the full-coverage crown restoration was removed from the Milling Center, the sprue was discarded and it was tried in the patient’s mouth. For this case, it was decided that customization using stains and glazes (Ivoclar Vivadent) would enhance the esthetic appearance of the restoration, and this task was delegated to the dental assistant. Specifically, a small amount of blue stain was applied on the cusp tips to impart additional depth and chroma, while a brownish stain was applied along the gingival margin to impart a more naturallooking dentin chroma in that area. A mahogany color was applied in the grooves to simulate the appearance of natural occlusal grooves. The restoration was then fired in a glazing furnace according the manufacturer’s instructions.
To seat the restoration, proper split rubber dam isolation was achieved. A yellow shade of adhesive resin cement (MultiLink, Ivoclar Vivadent) was used according to the manufacturer’s instructions and light-cured. Excess cement was removed, and final smoothing and polishing of the margins was accomplished, resulting in a highly-esthetic and predictable metal-free restoration in less than one hour (Case 1, Figure 4).
Case #2
A 63-year-old female—a long-time patient of record— presented to the practice for a recare visit after a reactivation appointment. No stranger to the benefits of in-office, same-day dentistry, she presented for treatment of the upper left first premolar, which exhibited a failing amalgam restoration, as well as the canine, which showed decay (Case 2, Figure 1). Following a thorough examination, it was determined that the canine could be repaired with a direct composite restoration that was placed immediately, and the premolar would be treated with chairside, single-visit full-coverage crown restoration that same day.
Case 2. Figure 5. Postoperative occlusal view of the final E4D restoration after final cementation.
After anesthesia was administered, the teeth were properly prepared for their respective restorations, and the direct composite restoration was placed. A conservative all-ceramic preparation as created for the premolar as previously described (Case 2, Figure 2). The tooth was scanned using the IOD, afterwhich a bite registration material was used to capture the bite, as previously described, and similarly scanned. Note that the ideal approach is to carefully apply just enough bite registration material to capture the teeth that oppose the preparation, but not so much material that they overlap the adjacent unprepared teeth (Case 2, Figure 3). This facilitates the ability of the software to automatically align the two images (e.g., preparation and bite strip) so that the design of the occlusion can be nearly automatic (Case 2, Figure 4).
The restoration was designed and refined, and the selected block (Paradigm C, 3M ESPE, St. Paul, MN) in the appropriate size (e.g., 12) and predetermined shade (e.g., A2) was placed in the Milling Center for fabrication. Upon completion, the restoration was tried in the mouth, after which stains and glaze were added by the dental assistant and the restoration was fired according the manufacturer’s instructions. The restoration was then permanently cemented using a translucent cement (Unicem, 3M ESPE) and finished as previously described.
Conclusion
Digital dentistry allows dentists and their staff to bring the benefits of all-ceramic materials using the latest bonding technology to their patients to help conserve tooth structure and provide the best care possible. By eliminating metal, we satisfy patient demands for economical, highly esthetic restorations. What’s more, bringing digital dentistry into the practice allows us the further freedom to make any necessary corrections or adjustments immediately, rather than replacing a temporary and reappointing the patient. The single-visit restoration provides greater patient satisfaction and the highest profitability for the practice.
The E4D Dentist System makes digital dentistry easy to use and provides a significant return on investment because it enhances efficiency for both the dentist and the staff, who can be delegated the tasks associated with designing the restorations. Most importantly, everyone in the practice will experience tremendous convenience, especially the patients. In both cases presented here, neither patient required the application of any reflective powder or spray on their preparations during the imaging process. Further, because the teeth weren’t temporized, the risk of bacterial contamination to the tooth surface was eliminated.